Yesterday, I wrote about backing up your DVD movies on to a hard drive (HD) as an ISO image. Today, I will be discussing how to back up movies to removable media, CD’s and DVD’s. ISO images are great they are relatively easy to create and use; however, with the average DVD movie being 6 – 9GB in size, it won’t be too long before you use up all your HD space. The most economical alternative is to create a duplicate copy of the DVD movie. Your average single layer DVD blank costs roughly $0.50/disk. But, there is a small problem. You can only record up to 4.7 GB on to a single layer DVD blank (note: these disks are often referred to as DVD-5). That’s a problem since the vast majority of DVD movies have more than 4.7 GB of video (note: these disks are often referred to as DVD-9. One solution is to use a dual layer DVD blank. But, they cost more – usually $1.50 - $2.00/disk – and they take a lot longer to burn. DVD burners can write to a single layer DVD at a maximum speed of 16x speed while writing to dual layer DVD has a maximum speed of 8x. Another solution is to use software to shrink the original DVD movie to fit on to a single layered DVD blank. I will be discussing the latter in this article. In order to accomplish this feat, you will need two software applications. First, you will need software to decrypt and shrink the original video files. Second, you will need software to burn the shrunk video file on to a DVD blank. I recommend using DVD Shrink, for the former, and Nero Express for the latter. DVD Shrink is freeware, but Nero Express is not. However, you can download and use a commercial trial of Nero 7 Ultra Edition; it’s a 30 day trial. Additionally, if you purchase a retail version of an optical drive then it is likely that it came with some burning software –usually Nero or Roxio.
 figure 1: Open Disk in DVD Shrink

figure2: Backup in DVD Shrink
When all the files are completed, start Nero Express. On the main window, click DVD-Video files (Figure 3). A new window will appear, click on the [Add] icon (Figure 4). A dialog box will appear and you’ll need to navigate to where you saved the shrunk video files. Highlight all the files and press [Add], followed by [Finished] and finally [Next] icon. On the new window, choose the DVD burner you plan to use, set the speed to “maximum” and then press [Burn]. The process may take several minutes depending on the power of your computer and the type of DVD blank you are using.
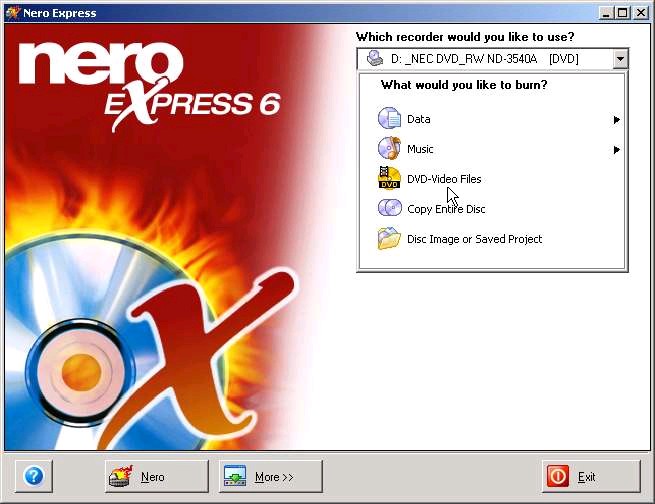
figure 3: Nero Express copying video files

figure 4: Adding video files to burn
2 comments:
Visit http://www.dofollowarticles.com to post articles in the following categories: developments, pond, grudges, honest, googl, moissanite, lawenforcement and more...
Visit http://www.dofollowarticles.com to post articles in the following categories: dimples, hope, cereal, Zanzibar, ezines, latinos, birding and more...
Post a Comment